Wednesday, November 24, 2010
No new pics
BUT..thanks to Brian and Jamie, we managed to get the whole car blocked down at 150 and it came up really nice. We need to pop the trunk off and re-glue the inside framework so that the skin doesn't flex so much and we can get it flat. Otherwise, there is one small corner of the hood that needs some love and we are ready to guide coat it again and block it down further. We are actually getting close to final prime!
Sunday, November 7, 2010
heavy prime complete
We got the car in the booth Saturday morning. Hit it with 150 grit,wiped it down and started priming. Brian and Brett layed two gallons of feather fill on it and it turned out great. We have. Couple of small things to fix and then we guidecoat,sand with 150, guidecoat again and go 220 then another prime session.
Sunday, October 31, 2010
Finally an Update!

I got the gas hood shock brakets made and Brian helped me install them. They work great and now I don't have to worry about being decapitated if the hood prop slips.
My fancy new Flaming River XL steering rack arrived, but I haven't had time to test fit it yet. Hope it fits.
 Spent some time with the fender skirts, smoothing them out and welding up the holes for the trim.
Spent an entire day on Brian's '60 Biscayne project getting the front suspension put back together; it should be a roller soon.
Tuesday, September 28, 2010
More Body Work
Nothing very exciting to post. Been doing more bodywork for the last couple of weeks. I did get the glovebox installed and the power trunk actuator in place. I hope to get some primer on it this weekend or at least get the bodywork done enough to head into a deep prime.
Sunday, September 12, 2010
3 Days of Body Work
 |
| Bob showing me how its done |
We finished blocking the car and I used the magic dent machine to pull up all the low spots. Some judicious hammering on the high spots got me ready for filler.
Today I wiped the Rage filler on all the low spots and broke it down with a DA and some 80 grit. Hopefully Brett has some time this week to help me block it all out and see what we have.
Bob suprised me this morning and came by to do a bunch of metal work. He welded up the emblem holes in the rear quarters, cut out and patched the passenger wheel well lip, patched the driver's quarter tip, and completely patched the trunk seam corners that were wasted.
I finished off the day by liberally filling those corners and grinding out the factory lead in the door/body seams.
Monday, September 6, 2010
Interior Sneak Peek

 Snapped a few shots of the front and rear seats for the car. Jaime's work is top notch and very affordable. I took a couple of pics of the stainless mesh he used for the rear speaker grille. It was a scrap piece from Brian's Biscayne and I wasn't sure if Jaime could make it work or not. It turned out beautifully! He is now working on one of the rear wheel well plastics so that we can build the rest of the door panels from there.
Friday, September 3, 2010
Intercooler Piping and Sealer: Done
 We got the tub taped and sealed this week and got the fenders done too. I got some guide coat on them so I can start blocking and see where the bad spots are. This weekend I'll get the doors, hood and trunk done, along with the skirts and some small pieces.
My front and rear seats came back as well. I will get some pics up asap.
Sunday, August 29, 2010
Ready to Seal

I included some pics of the pristine NOS hood that Kevin sent down. All I had to do was scuff it up and its ready to prime.
Got some nice pics of it in the sun too.
Hopefully Brian has some time one night this week so we can wipe it down and shoot some sealer on everything. Then I get to put it all back together, throw some guide coat on it, and get to blocking.
Friday, August 27, 2010
Burnout Complete
Last night we rigged up some piping to get boost to the motor so that I could cruise it around the parking lot a little. Of course that required a mandatory first Burnout to..ahem..verify that the Posi works..yeah, that's it...
It works. And the motor is pretty snappy given it still has stock injectors and no tuning. It made boost fast enough to blast one of the boots in half.
OK, back to real work now. Getting some of the panels in primer this weekend.
It works. And the motor is pretty snappy given it still has stock injectors and no tuning. It made boost fast enough to blast one of the boots in half.
OK, back to real work now. Getting some of the panels in primer this weekend.
Wednesday, August 25, 2010
Body Work...ARGGGG
OK, so over the past ten days, we managed to get the hood, doors, decklid and the bulk of the shell taken down to metal. The shell is actually really great-better than expected.
The hood had some obvious bondo in it, but it was pretty hammered when we got it stripped. The AWESOME news is that a guy named Kevin contacted me and had an NOS hood in his rafters that he was willing to GIVE to me--if I could get it down here from Washington state. I started asking around and one of Bay Auto Body's old partners was headed down from Seattle, so I was able to make a deal and get that hood coming.
The other crappy spot was the driver's door. It looked good in primer, but MAN it was hammered. I found a bullet hole, several creases and tons of poorly executed bodywork. Turner's Auto Wrecking in Fresno had a driver's door, so that's on the way now. Everything else looks salvageable.
The intake piping got started last weekend, but I ran out of time and this week has been nuts at the shop, so it will be this weekend before I can get back to it.
Wednesday, August 18, 2010
Its Driving! Check out the first video!
Finally got an hour to get the other axle cut and installed. Got it going late yesterday. Now I can get the exhaust done so it doesn't look like I have a BBQ going under the hood.
Sunday, August 15, 2010
Bodywork Has Begun!

Brian Jennings, the future painter of Rattlerod, hooked me up with an 8" DA and an 8" electric buffer/sander. I managed to get the driver's quarter and most of the passenger's quarter done today. I will probably be bedridden for a couple of days, but I got it done. On the plus side, I found no appreciable rust anywhere, and just one poorly repaired crease on the driver's side. Brian assures me that he can make quick work of the crease with the stinger.
Check out the pics of the sweet patch panel that Bob made also. Inner and outer fit like a charm and are tacked in, awaiting final welding.
I also got my coolant lines finalized and Danny is working on a custom, sheetmetal intake setup so that we can complete the piping for the intake. Since we missed Redding, I am now hoping to get it to the GoodGuys show at the end of August. I'll take it, even if it has to go on a trailer. I should at least be able to cruise it around the event.
Wednesday, August 11, 2010
Quick update..
OK, so the brakes fought me for 2 days. Turns out the Wilwood Prop Valve wasn't allowing any fluid to the rear brakes. I bypassed it for now and the brakes are good. Wiring is pretty much done until I get the light harnesses and stereo stuff in.
We keep digging in to the bodywork and everything still looks great. Bob got one of the quarters tacked in, and I'll have pics of the work on Saturday when he gets the other one done.
Had a minor setback with the transmission, we must have nicked the front seal and it was leaking, so we pulled it and resealed it.
You know the adage "Measure twice, cut once"...well, I did that, unfortunately, my math skills must have been off that day, because I managed to cut one of the axles 1/2" too short..DOH! The car won't motivate very well with one side of the diff spinning free. Randy's Ring and Pinion is sending out another on for me today, so by tomorrow night (providing I can measure it correctly) the car will be moving under its own power.
Friday, July 30, 2010
Monday, July 26, 2010
Minor Update
The shop has been crazy busy and my Mom was in town, so progress has been a bit slow for the past couple of weeks. The wiring is almost done, and the brake lines are all made. Still need to weld some studs on the diff housing to hold down the brake T, install the trans dipstick and shifter that should arrive today and mount the battery box. I hope to have it running sometime this week.
Friday, July 16, 2010
July 16th Update

The good news is that Danny and Jake have been hard at work on fab projects on the car, so at least some progress is being made.
I finally got the car on its wheels and rolling and it steers so well, I am concerned I might not need the power steering after all...We'll see.
The rear of the car is a little high at the moment, but there is no fuel in the tank, no battery, sub, or amps in the trunk and no top or rear bumper on the car, so I will reserve judgement on the rear height until I get that stuff in the car.

We got the mounts made for the intercooler heat exchanger and intercooler, and Danny got all the piping laid out. Hoover at TurboHoses hooked me up with some nice silicon boots to make it all work, now we need to make support brackets for the piping and an intake solution and we are set.
Chad got the pump timed and my SDX injectors showed up. The motor is ready to fire as soon as the wiring is done.
I ordered up a Lokar dipstick and shifter since the factory linkage has no room to work. This wasn't my first choice, but I think it will be cool anyway.

Next week I will start my 6am mornings and get the wiring finished up so that we can test everything out and get it running. Then its on to brake lines and a test drive.
Sunday, June 27, 2010
May 27th. Gauges and Cooling complete

This week I fought with the new diff. Turns out I have an oddball 9" with big bearings. That would be OK, but EVERYTHING I got from Randy's is for a small bearing rear. After some research with Ray at SP and Tate at Randy's we came up with a bearing and seal that would work and we pressed them on. After pulling them apart a second time to install the wheel studs (DOH!) I got them installed for the last time. Brake pads for the 76-78 Ford LTD Country Squire Wagon that the rear came out of are basically obsolete...yeah, super...I found two sets and bought both, just in case.
Danny got the fuel tank sump finished and re-installed. Just need some fitting to complete the fuel system.
Jamie came by on Sunday and we got the dash (that sucker weighs about 80lbs!) installed into the car. I then mounted up the steering column so I could figure out the next challenge of getting the shaft to mate up with the new rack. It doesn't look as pretty as I thought it did a month ago, so we'll be doing some exploring of options there.
Saturday, June 19, 2010
Massive Progress!
Southern Diesel Xtreme signed on as a sponsor and hooked me up with some 5x.14 injectors for the car. These equate to a 140hp injector. More than I need, but then... what else is new?
I worked with Source Tube and Hose to get the power steering lines custom made, so they are installed and ready to go. The Vacuum pump was rebuilt by Brett and Jeremy got the master/booster installed. He also made a trick mount for the proportioning valve.
Danny and I got the radiator mounts made and he cut one of the tanks off of the intercooler and flipped it so that we can make it all fit.
Jamie came by and helped wire wheel the inside of the fenders and the rear springs and then we primed and undercoated the insides and painted the springs.
I got all the front sheetmetal re-hung so that we can fit everything up.
We dropped the tank back out and we are adding a sump to it so that I can have a bigger pickup and some baffling.
I also got the trans cooler location marked out and now I need to make some mounts.
Bob was by earlier in the week and cut out the rust on the driver
s side and he has already made inner and outer patch panels for both sides. They just need their radius and we'll be good to go.
Decided to shave the handles, add poppers and shave the antenna also, just to smooth the car out.
YeeeHaah..Back to it!
Tuesday, June 15, 2010
Quicky. No pics.
This past weekend I got the front, inner sheetmetal all cleaned up and painted. I also got the rest of the accessories on the front of the motor and got the vacuum pump ready to rebuild. The front brakes are on the car and George has the downpipe tweaked enough to make it work for now.
A big box of random parts showed up today. I got new seatbelts, some trick LED-ringed lights for the Overdrive and Converter Lock buttons, a pair of battery boxes and remote mount kits for the batteries and the Wilwood prop/combo valve.
The dash is together, including the gauges and stereo, I just need to re-install the factory wiring and then wrap it up and get it out of the living room.
Sunday, June 6, 2010
June 6th Update

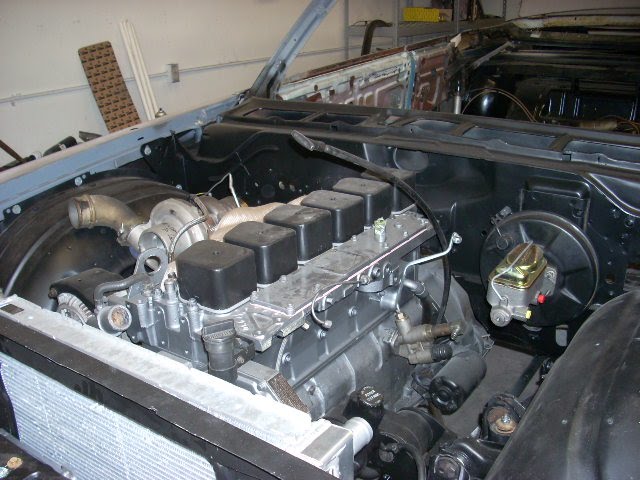
Its been a couple of weeks since I took the time to update. The turbo is back on the engine, as is the head with 12 new valves. I got the turbo manifold blanket and installed it. It isn't pretty, but it should keep the paint on the hood.
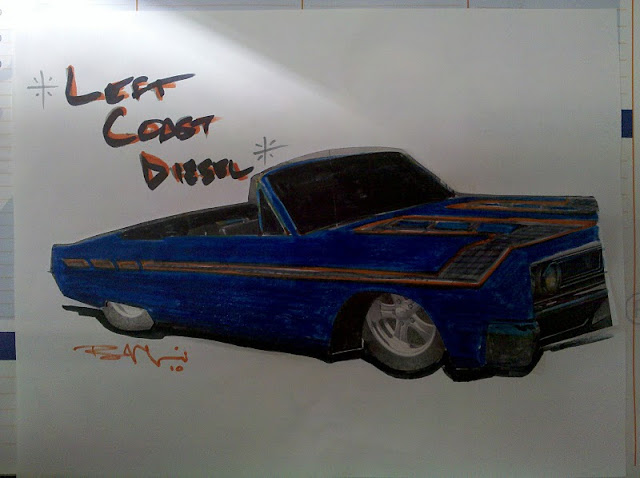
Laurie and I went to Good Guys on Saturday and looked at colors and interiors. I can't believe it, but I think the car is going to end up a dark, metallic blue. Stay tuned for that decision.
I made some serious headway on the custom dash. Gauges are installed and I am in the process of wiring them up. I need to get it done so we can install it to hang the steering column in its final resting place.
Front suspension is basically done, except for the torsion bars and we'll knock those out later this week.
Trans will be done Monday night and installed Monday night or Tuesday.
Diff will be back from Maier's on Monday night, so we'll get into that as well.
Things are rockin!
Saturday, May 29, 2010
May 29th Update

Today we got the engine re-installed for what we think is the last time. I got the fuel tank painted, all of the front suspension painted, the old bushings and ball joints out of the arms and the new poly bushings installed.
This week also brought a couple of big boxes from the fine folks at Randy's Ring and Pinion. They set me up with a nodular drop out for the 9 inch, a solid spacer, new axles with the right bolt pattern, a Yukon Grizzly limited slip unit, a set of 3.25 gears and a rebuild kit. The housing is off to Maier Racing to be shortened 1 1/4" per side and then its reinstallation time.
If the motor looks short in the car, that's because I ripped the head off and sent it up to Wright's Machine Shop in Yuba City, CA for a deck and refresh. I am installing heavy duty springs to allow me to get a 4k rev limit. ARP studs will go in Tuesday night after I get the head back.
We installed the engine without the transmission to make sure that the trans is separately serviceable. I want to be sure we can get it in and out without disassembling the whole front of the car.
We mocked up the intercooler mounting this week too; we'll get it installed later this week as the front of the car comes together.
Sunday, May 23, 2010
May 23rd Update

This week we got the subframe connectors welded in and got the rear of the underbelly cleaned up and undercoated. One of my customers also gave me a Ford 9", disc-brake rear, so we cut all the brackets off of it and test fit it with the wheels to see how it fit. We need to shorten it 1.5" on each side, so we'll get that done this week if we have time.
Danny got the Lower Control Arms reinforced and did a little repair on the hood hinge mounts to strengthen them.
I had another minor victory with the convertible top. After some cleaning and cycling of the pump and some serious bleeding, I got it to work. It now goes up and down smoothly.
At the house, I got the dash trim painted up and got the main dash assembly primed. Still need to make the template for the Autometer Gauges, but that shouldn't take long.
I also managed to work out a barter with Brian to handle the painting, and he may have me convinced to shoot it a real color instead of hot rod black. Time to get out the colored pencils again and see what I can come up with.
Sunday, May 16, 2010
Fab work is complete, Disassembly in Process

We finished the fabrication this week (except for the subframe connectors. We got the trans mount done and got all of the other welding completed. I tore apart the dash at the house so I could paint the pieces and dye the dash pad. I also got the engine on the super-trick rotating engine stand and re-gasketed the whole thing. Got the rear-main replaced as well. This week I will get the high rate valve springs installed, adjust the valves and paint/install the valve covers. Check out the pics, there is a cool shot of the turbo being test fit. Not only did it fit, but the HX-40 downpipe from the donor truck actually fits too!
Saturday, May 8, 2010
Radiator is DONE

Got my BeCool radiator from Summit yesterday, and as expected, it was too tight to squeeze between the frame rails. Danny, the master fabricator (who also used to build radiators..) had a solution. He notched one of the tanks and then flipped the piece he removed and tig welded it back in place. Viola! We are done with the radiator, now we need to make a mount for it.
Motor Mounts..>Take 2


Decided to re-measure everything before we did the passenger motor mount. Something told me it wasn't straight, and I was right. We cut the driver's mount back out and started fresh and square and it worked out great. Got both mounts done today and created even more room to run the steering shaft to the rack.
May 8th Progress`


Today I got to the shop at 6:45am and went to town on the trunk floor. For some reason, a previous owner or bodyshop slathered the floor with bondo. What a mess to grind that out! Floor was very solid, so I have no idea why they did that. Anyway, I got that ground down and then wire wheeled and then hit all of the floor areas with POR-15. That stuff rocks and it looks like a million bucks in there now.
Got some trick wheels!


Found these wheels on Craigslist. They are Vintage Wheel Works v48s in 17 x 9.5 and 17x8. Wheels and tires are brand new and have never been on a car! The wheels retail for $348 apiece and I scored the whole set, with tires, for $1300. They are different and look awesome on the car. Front tires may be a bit short, but we'll see.
Sunday, May 2, 2010
Steering is DONE!

Today we finished the steering rack mounting. It turned out WAY sweet! Danny machined up some threaded tubes to bolt the rack into and we notched them up into the new crossmember and welded them in.
We then mounted the engine and trans together and stuffed them into the engine bay. We mounted up the fenders and hood for a quick clearance check and then got the 24v-style motor mounts on the block. Looks like the motor mounts should be pretty easy to knock out on Tuesday. The tranny is even sitting about where the stock one did.
I got the floors all wire-wheeled and hit it with some rust converter. I will go back through tomorrow with POR-15 to finalize it.
Got our radiator measurements; looks like Summit will be providing that for us. Need to find a water-to-air intercooler solution also. More pics up in the gallery!
Thursday, April 29, 2010
Crossmember Fabrication

Last night Danny came by and we attacked the crossmember. Well, to be fair, he did the all the work on the crossmember and I worked on removing the steering column, dash parts and wiring bits from the inside.
We took the previously forward-curved crossmember and made it straight across to allow for the best steering geometry with the Mustang II rack. We realized that we had the wrong 220v plug in the new shop to use the wire-feed welder, so Danny used his stick welder. This guy is a real artist. Most welders would be lucky to do such clean work with a MIG, and this guy makes it look easy.
The end result is a sweet, boxed and reinforced crossmember that is made of 3/16" plate and is smoother and stronger than the factory unit ever was.
Saturday, April 24, 2010
HUUUUGE Progress!

Today we ripped out the drum spindles, sway bar and steering components to test fit the engine. The great news is that it will fit under the hood, so that rocks. Danny then showed up with his mobile welding rig and cut out all the steering mounts and motor mounts, then ground everything down nicely. Totally awesome, he just jumped right in.
I reversed the spindles and had SP send over a Mustang II steering rack to see if I could make it work. We are going to reinforce the backside of the crossmember and then essentially make it straight across on the front side. We will build in the mounting for the rack on the frontside and make it as straight as possible to minimize bumpsteer. I am going to have to get creative for a swaybar solution.
All-in-all and amazing day of progress!
More pics in the gallery
Friday, April 23, 2010
Engine is out
Today, Jimmy got the engine out, and we removed all of the front sheetmetal. After some research, it looks like airbags for the front are a no-go without more fabrication that I care to take on. The trick, it seems, is to go with some seriously heavy-duty torsion bar replacements and crank them to the desired ride height. Should ride and handle well.
The Cummins is a rear sump design, so I either have to go with a different pan/pickup or change out the rear-steer setup that is in the car. I am going to try to swap spindles from left to right tomorrow to see if I might be able to fab in a 3/4 ton dodge ram rack and pinion into the front of the frame and simplify my life.
Since we are this far, we will get everything mocked up and then have the frame blasted and painted so its nice and clean. Not sure if I need (or want) to blast the body. Its clean and has nothing more than surface rust, so I think we may be ok.
Wednesday, April 21, 2010
Minor Progress
Got the car into the corner of our "Area 51" shop and got the front on jackstands. Yanked the hood and drilled out the rest of the rusted-in top hold down screws. What a PITA! Checked out the frame some more, and based on the amount of torque we will be throwing at this car, we are definitely going to have to box the subframe and run subframe connectors to the rear of the car to prevent some massive twist.
Found a potential interior guy--'Mr. Quan' I hope to talk to him tomorrow and get the interior dropped off ASAP so he has plenty of time with it.
Found a potential interior guy--'Mr. Quan' I hope to talk to him tomorrow and get the interior dropped off ASAP so he has plenty of time with it.
Tuesday, April 20, 2010
Just added some photos of day 2
Just added some "after" shots from Sunday. I removed the remaining interior, scraped all the loose paint/rust off and powerwashed the floors to get rid of the surface rust. I am bagging every fastener and labeling everything for easier re-installation. I still can't believe that this thing actually runs as well as it does and all the electrics work!
Slowing things down...and getting it up!
Today I got some great news. Turner's wrecking in Fresno hooked me up with a set of '71 C-Body spindles, a master cylinder and a booster for my disc brake conversion. SP, one of our big local suppliers, set me up with rotors/pads/hoses/calipers as well. Total investment in the conversion....about $500. Not too shabby!
I also managed to get the top mechanism to work enough to verify everything is there and functional.
I also managed to get the top mechanism to work enough to verify everything is there and functional.
Monday, April 19, 2010
The Vision
Welcome to my blog! I am going to attempt to document the entire build of a dream that has been brewing for several years.
My name is Erik and I am serial hotrodder. Seriously, I need help. I can't leave anything alone for long. Rattle Rod is the first project that I actually stewed on for years, trying to figure out how to do something different, fresh, relevant and cost-effective.
I decided that I wanted a fat, old, low car that I could transplant a diesel engine into, with the goal of a 12-second quarter mile, 30mpg cruiser that I could drive every day. I started searching in earnest in February of 2010. I quickly realized that anything from my desired target area ('45-'54) was going to be WAY too expensive and probably not in great shape. They would also need complete modernization of all suspension, braking and drivetrain components in order to support the heavy, powerful engine I had in mind.
With that, my focus shifted to the '60's. I wanted something a little different, preferably a Mopar so that we could keep it in the family. I checked out a Chrysler 300, several Cadillacs and finally cam across the beast you see here, a 1967 Chrysler Newport convertible. Hey, if you are gonna cruise, might as well get a tan.
Subscribe to:
Posts (Atom)